OpenDNS is one of my favorite online services; whenever i set up a new computer or a new network, it’s one of the first things i set up. I encourage folks to use it as well, and i want to show you how to set it up on Apple’s new Mac OS X Lion.
OpenDNS is a free-for-home-users DNS which is very likely to be faster, more stable, and certainly much more feature-rich (if you set up a free OpenDNS account as well) than your ISP‘s default DNS.
What is a DNS? A DNS is a necessary service which translates human-friendly domain names (e.g., google.com, rickbeckman.org) into machine-friendly IP addresses (e.g., 127.0.0.1). The time it takes to do this translation results in a tiny increase in load times for your online activity; likewise, if the DNS fails, you will not be able to load the desired domain name. Therefore, using a speedy, reliable service such as OpenDNS is recommended!
Setting up OpenDNS on Lion is also incredibly easy!
-
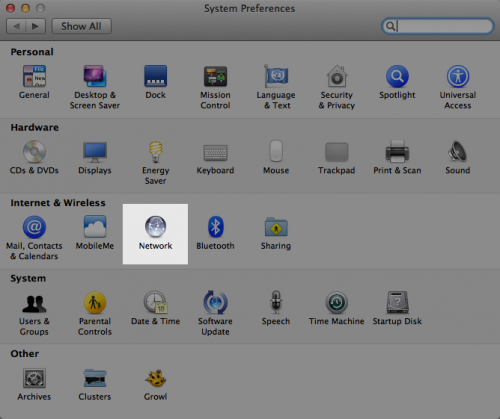
Open System Preferences (located in the Apple menu). In the System Preferences window, locate and click on Network in the Internet & Wireless category.

-
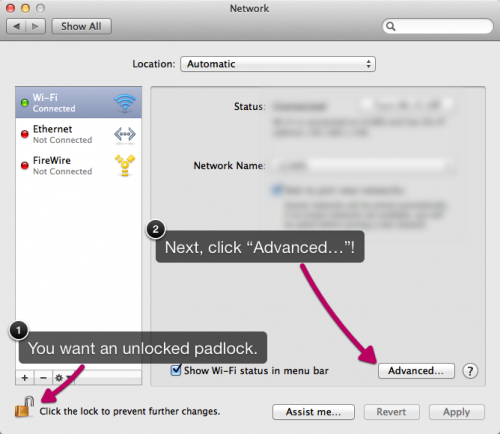
If the padlock in the lower-left corner of the Network window is in an unlocked state, continue to the next step.
If, however, the padlock indicates that you must click it in order to make changes, do so now; you will need an administrator password in order to continue.
-
The remainder of this tutorial can be applied to your computer’s wi-fi, ethernet, or FireWire (if available) connection. Simply select the desired network connection from the Network panel’s lefthand sidebar.
Next, bring up the advanced settings by clicking the Advanced… button.

-
Warning! Here be dragons!* If you are not careful with these settings, you could potentially render network (and thus, Internet) access on your system inoperable. Always make sure you understand what you’re doing before you make any changes; furthermore, you are using Time Machine, right?

The Advanced settings are divided up into several categories, available as tabs at the top of the pane. You want to select the DNS tab.
-
The DNS panel is made up of two sections: DNS Servers & Search Domains. Below the DNS Servers box, you’ll find two buttons: + & –. Likewise, the DNS Servers panel may already be populated with one or more servers.
-
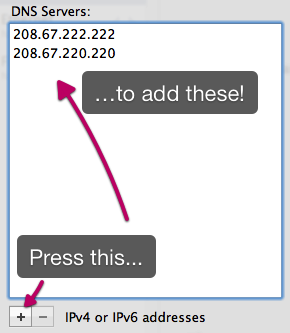
To replace the existing name servers with the OpenDNS servers, simply press the + button.

Pressing the + button allows you to begin typing a DNS address. Type 208.67.222.222, and then press Return.
Press the + again in order to add the second OpenDNS address: 208.67.220.220.
-
All that remains is to save your settings: Press the OK button near the bottom-right of the current window. Finally, in the main Network window, press Apply in the bottom right.
Re-lock the padlock in the bottom-left if you so desire, then exit System Preferences.
Your system will now use OpenDNS to look up Internet addresses, allowing you to take advantage of all its benefits.
Taking It Further
If you have a home network set up using a router, you’ll probably want to make OpenDNS your router’s name server.
Additionally, if you want to take advantage of great OpenDNS features such as phishing protection, content filtering, and more, you’ll need to register for a basic OpenDNS account.
I highly recommend it!
* Or perhaps more appropriately, the OS X Lion / dragon hybrids of myth: chimaera.
Hey Rick, what an awesome post. We love your easy-to-understand explanation of DNS and sure do appreciate you helping others get OpenDNS configured on their machines. We’d love to send you a t-shirt for yourself or some stickers to giveaway to your friends who use OpenDNS. Give me a shout if you ever need anything.
Erin… Wow! I’ll get in touch with you via e-mail right away!
Totally my pleasure to do the tutorial. I’ve believed in OpenDNS as an indispensable service since I first discovered it, and with a five-year-old at home who is learning how to use computers at school (already!), the family filtering you guys provide is just that much more important.
Kudos to you & the whole OpenDNS team!
Rick, thanks for these easy to use instructions. I just switched from AirPlay to Time Machine and it threw my OpenDNS off. Quick to correct with your instructions. BTW, agreed on the value of OpenDNS. We use at home and I encourage schools/libraries to do the same.